The Cornell Note Method

Reading time: 5 minutes
Why you need it:
It’s an unfortunate fact that most students don’t know how to create good notes. They know how to take them, but not how to make them work for them. Effective notes, from independent reading or in the classroom, are more than a record of information, they should be created to improve your memory and help you study better.
For most students, notes are little more than a quick reference device or a summary list of ideas. They take notes like a court stenographer capturing the testimony verbatim but don’t think more deeply about how they intend to use this information to study and remember.
We’ve don’t think the term “note-taking” fits the purpose of this activity. We prefer the term “note-making” because it is a more positive way of thinking about what you should be doing.
Good note-making is more than summarizing. It’s a skill of digesting and thinking about new information used for better learning which means it is markedly different from the activity of recording like a stenographer.
We think the Cornell Method is the best approach to use for notes because it encourages you to write things down, and it’s an easy way to improve your brain’s cognitive skills, while making retention of information easier, and boosting your memory.
The Cornell method was developed in the 1950s, and like many better learning strategies, even though it’s easy to do, it somehow remains largely unfamiliar to students and parents. We’d like to change this. It’s too good not to share with others.
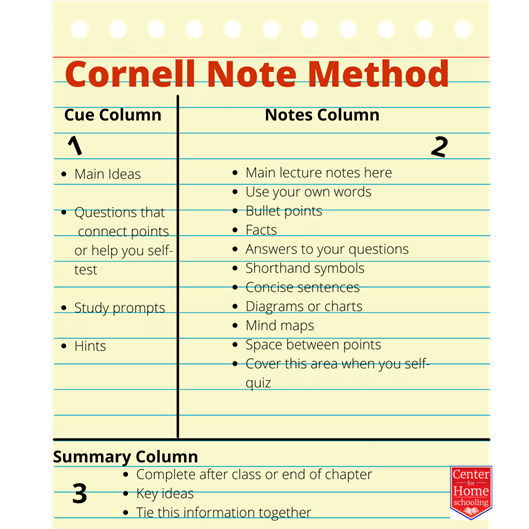
It is designed to help the student understand more deeply, help them synthesize the information, and create a work that makes it easy to review and self-test. Don’t let the simplicity of it fool you – it is an advanced technique that pushes you to think about the information you are receiving. To begin, there are three areas you set up on your note page, each with a different purpose. The student divides the note page into three sections. Here’s how to do it.
Left Cue Column
On the left side of the page, create a column that is about 2 ½ inches wide or about one-quarter of the page width, by drawing a vertical line from top to almost the bottom. Title this “main ideas” and use it for recording headings, key concepts, or keywords. In this area, you can also pose questions that you will answer later when you study. Or use it to self-quiz yourself on the details in your notes on the right side. No details are recorded in this area – just key ideas. This forces the student to think about and organize information, a necessary step to learning.
Right Note Column
The area to the right of the vertical line is about 6 inches wide and this is used for your detailed notes. Label this section “notes” where you record information in bullet or outline form. This is also the area where you can create diagrams or mind maps to show relationships. It’s important to write information here in the student’s own words and not merely create a transcription from the source. This forces the student to think about meaning and to make connections to information they already know.
Summary Section at the Bottom
The bottom of the page is separated by a horizontal line with a small 1- or 2-inch tall area where the student summarizes the major ideas or points. This is usually done at the end of the reading or classroom session. This last step is done after you review your notes, and the material again if necessary, where you summarize what you just learned. This is an important step – it helps the information stick – so don’t skip this section. This completes your thinking process with the new information.
What the Cornell Method Looks Like
As I mentioned, good notes are recorded in a way that makes them easier to review and use for future studying. When you do this, it supports important learning activities like self-quizzing, recitation, and that all-important retrieval practice. Below is the layout of the Cornell Method.
You can DIY your kid’s pages by using a ruler to create these sections on a blank sheet of lined paper, or you can purchase pads of paper already set up for it.
This is what it looks like with reminders of what you need to do in each section:

Advantages
When you teach your child to use the Cornell Method you will show them how to make:
- Notes that are easy to use and work with.
- A living documents that is easy to extend and add more to.
- A learning tool that makes you think about what you are studying.
- Something you can use for retrieval practice and self-testing.
How to Coach and Learn to Do It
How can you get your kids to use this powerful learning strategy? Here are some tips on how to get them started:
- Explain it – what it is, how it works, and why it will help you learn faster. (That’s the benefit for the kid)
- Practice it – read a chapter together and make notes separately (without discussion) using a lined piece of paper. First practice creating questions by skimming the chapter first and writing down questions you want to answer by reading it in depth. Then compare what you did and learn from the better ideas.
- Discuss it – Bring it into one of your classroom lessons. Ask each child to make notes using it, and then have each present what they listed in their notes and why.
- Movie Night – Use something fun to practice it. Watch a movie together and use the form to take notes about the major characters. Occasionally pause the movie to make notes. Use the Cornell Method to record interesting information to discuss later, such as what the main characters did and why they were motivated to do what they did. Or break the movie into sections and have everyone make notes about the action and interactions between characters.
Each section in the Cornell method serves an important purpose to learning. There are plenty of online videos which provide examples. You may also visit the Parent Resources section of our website for more information.


